Friday 19 May 2023

Kain Amigurumi

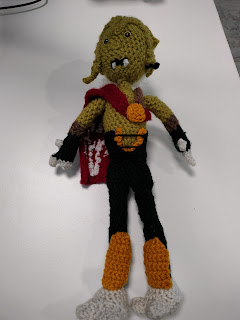
This is one I started working on pretty much immediately after finishing my previous doll - the namesake of the Legacy of Kain series: Kain (in his Elder Vampire form)

It's been quite hard to work up the motivation for typing this up, in part because I sort of live-tooted it over on Mastodon

Nevertheless it's been a bit of a long journey - we have a puppy who would probably try to eat whatever I make, so I was only working on it during my lunch breaks when I'm in the office (so at most a couple of hours each week)

Through into that my getting an abscess on my back and getting it surgically removed, there's been a lot to get in the way (up-side though is that I now have a hole in my back that I could hang crochet hooks off of if I were a complete lunatic)

This one used the same base as the others (AmiguruME by Allison Hoffman), but of course, with some adaptations. The flesh was done in a dark green (I couldn't find anything to accurately be the sickly-vomit-green-and-yellow of his flesh in the games, so this was a good abstraction in my opinion) and the legs in plain black.

Legs/Feet

I used the same technique for the feet as I did with the Janos doll, but used a sort of off-white acrylic yarn to give it a sort of ivory colour. This was also to try to make a clear distinction between the claws and the hair.

The grieves were done right at the end - using the "traverse root" method (just doing a bunch of slip stitches into existing stitches as a basis for more) I made them using some yellow acrylic to make them sort of golden. I wanted to do this to make the legs more interesting. Despite measuring them against one another, I didn't remember the number of rounds/rows, so they ended up slightly different heights. I'm quite annoyed by this whenever I look at it. You could call me a-grieve-d! (I'll get my coat)

Arms/Hands

As mentioned, the flesh was in a dark green acrylic yarn, changing to a brown alpaca wool for the sort of leather wraps, then finally to black for his gloves.

Following the Commander Sterling doll, I discovered that Allison Hoffman had created a pattern for hands with fingers, which is sold on her shop.

Of course I bought it, so that the fingers would be in better proportion. It took me ages to get around to downloading it. In fact, I had waited too long, so the link was invalid. However, Hoffman re-enabled the link for me once I emailed her about it - top tier customer service.

To make the claws I joined the fingers together into pairs and then used decreasing to make them pointy. I made the thumb twice as wide on the hand and did the same thing to decrease to a point.

Body Accessories

In terms of the body, there were a few accessories to make.

First of all was the cape. I absolutely obsessed over this. I wanted to see if I could get the symbol onto it by doing colour changes, and minimise carrying across stitches (because that looks messy)

I created a tool in ReactJS in order to visualise this... and found that if I were to do it in the size I want, I would have to embroider it instead. Oh well. (Note, I'll make the tool available eventually)

I also made the cape a bit short - in my head, it went to the centre of the chest (under the medallion), and the rest is leather straps, so I worked to that.

Then I decided to use the toy as a reference, and found that the cape should wrap right around the body, and instead the leather strap just sort of floats there, not connected to anything other than the cape. Weird.

So I did the rest of the cape, and the leather strap.

The doll next to the action figure, with the paper pattern for the codpiece

The final part was the "Plunging Codpiece (TM)" - I realised that if I were to place the bottom of this at the top of the leg/waist section, it would be too high. Thankfully, I could use the gold/yellow internal section to sort of hide this, make it look like the waist was lower than it was.

I drew the pattern on paper, and went by that rather than a pattern in terms of stitches and rows. I'm pretty pleased with the result.

Head/Face

The face was relatively normal, following the pattern and using white acrylic for the hair. Looking at the toy I was using for reference, I tried to draw the crests. They looked to be in three parts, but had to be distorted because the doll's head is stretched in comparison to the more realistically proportioned toy. I think it ended up looking a bit strange, and not so much of a scowl, but it did hide issues with the hairline. The earring was a very simple thread with a knot at the end, stitched into the left ear.

The back of the doll, showing that I cut the hair far too short

In terms of the hair, I made it extremely long in order to get it to the right length, and then cut it down. However, when I ended up cutting it, I definitely cut it a bit too short, because some of the strands would have been loose (they were too short). I just have to keep reminding myself that this is an abstraction.

To quote a famous dog that lives in a burning house, "This is fine!"

Conclusion

There are a few changes I would try to make were I to do this again, but overall I'm happy with the result, despite some niggling little issues that annoy me.

I may eventually have the patience to try to make him a Soul Reaver to hold, but I don't know how to make skulls, and I also don't know how to make the kriss blade without making it too floppy.