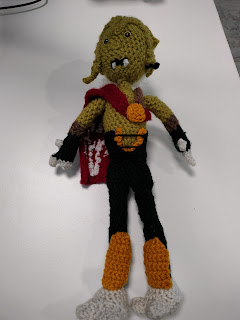
Friday 1 March 2024

Bowser Amigurumi

After the Mario film came out I asked my son which character he would like a toy of, and he chose Bowser.

This is pretty much the reason I started learning yarn craft in the first place, so I made him one.

The pattern I followed was from this particular blog post from 2011 https://epic-yarns.com/2011/10/04/bowser/

I submitted a comment asking for some clarification, but didn't get a response. I think the blog is somewhat abandoned.


However, you could consider this post as a supplement, as I have some suggestions on how to improve things.

1) First of all, the instructions for putting everything together are not the best. Even the follow up edit with photos doesn't make things much easier. As such, I will put some diagrams here (as they are clearer than photos)

2) The mouth is made of 10 pieces - 4 big balls, 1 small ball, 2 small tubes, and 3 big tubes. These all get stitched together using their tails. I'm not the best at stitching, and I would worry that things could come apart (I'm definitely not good with cutting the loose ends)

An improvement would be to combine the pieces together. For example, rather than 4 balls where there are 2 pairs of 2 connected with big tubes, instead, do the following:

Follow the ball pattern and stuff it. Then sc 3, inc, sc 3. SC8 for 7 rounds. Stuff the tube. SC3, decrease, sc3. Follow the ball pattern from round 2 onwards. Stuff the ball. Dec 3. Finish off.

If you do that twice, you now will have two bar-bell shapes, and have drastically reduced the amount of stitching required. Perhaps you could even put some sort of nubs (just keep stitching into the same stitch to create a lump) on one of the final rows of one of the balls to indicate where to attach the bottom jaw.

Regardless of if you do that, here are some diagrams showing how the parts of the head fit together

An svg diagram of how to put the head together

3) Personally, I wanted to avoid using felt, so they eyes and inside of the mouth were made entirely with yarn.

To make the inside of the mouth I did the "lower jaw flap" two more times in pink (though I think they were a round smaller). One was attached directly to the open part of the head, the other was stitched onto the inside of the lower jaw flap.

4) The shell is the wrong size. The instructions state to make the green piece, and then to make the white tube to equal the circumference of it, but doing that makes it too big for the body, and I had to stitch it really tightly to cover those gaps. I'm not sure how to fix this apart from making things smaller, or the instructions clearer.

5) Following on from that, the instructions mention putting the legs on before the shell and tail. I'm glad that I put the shell on first, because once I did so it vastly reduced the available space for the legs and tail. It was difficult to get everything balanced and in the right place. This could definitely be cleared up, though fixing the shell size issue may make it a non-issue.

6) The instructions are not clear as to what needs to be stuffed and what does not. The hair, for example (which many other people have asked about, but not had their questions answered) - when I was putting it on, I felt that it was better to not stuff those pieces, otherwise they would struggle to fit on.

7) The eyebrows. Honestly, this was easy to figure out, but not from the description or the pictures - funnily enough, it's hard to tell the difference between one layer of orange and another layer of the exact same orange in a photo. Diagrams (or photos with pieces in different colours) would help massively. Here are some more.


Finally, my other additions were a tongue for the inside of the mouth, and eyes. These were mainly done freehand, so I do not have patterns for them.


Next, I'm moving onto something self indulgent and hopefully easier, because this one was a nightmare!

Wednesday 15 November 2023

Godot - Rotating a Camera in 3d space

For the past couple of years I've been dabbling about in Unity, but due to their recent PR disaster, I've shifted over into dabbling with Godot instead.

The project I'm trying to create is a turn-based strategy game, which would include terrain. As such, units might be hidden behind terrain, so the user should be able to rotate the camera.

To this end I've been following the Godot tutorials, creating a 3d plane, and putting a box in one corner so that I can see how the whole thing would rotate (if it were a plain plane, I wouldn't be able to tell it rotated). I didn't bother putting in a player character yet (as the concept is quite different to the example in the tutorial), but I did follow the steps for implementing a camera.

I wanted the camera to rotate by increments of 90 degrees (so there would effectively be 4 positions). Unfortunately, most of the maths in the documentation is about radians, which doesn't seem useful to me for this case, as it makes the maths more complicated (and less precise due to pi having [as far as we know] infinite numbers after the decimal)

Eventually I found that I could use "rotation_degrees", giving me the exact precision I wanted and without requiring more complex calculations. I didn't want the transition to be instantaneous, so I used "lerp" to make the camera rotate over a series of frames (apparently this is an abbreviation for "linear interpolation", which makes sense) - I got this from one of the Godot samples (but it didn't have much annotation)

I also wanted to make it so that inputs are ignored during rotation, that the user can only do one rotation at a time. To this end, I wrote the code so that when it starts rotating it sets a flag, then when finished it resets it. If it receives another instruction to start, while that flag is set, that instruction is ignored.

Below is the code I had for that point, before things get particularly interesting.

extends Marker3D

const ROT_SPEED = 10
var rotating = false
var targetRotation = 0

func _ready():
	targetRotation = rotation_degrees.y

func rotate_left():
	targetRotation = targetRotation - 90
	if(targetRotation < -360):
		targetRotation = targetRotation + 360
	rotating = true
	print(targetRotation)
	
func rotate_right():
	targetRotation = targetRotation + 90
	if(targetRotation > 360):
		targetRotation = targetRotation - 360
	rotating = true
	print(targetRotation)
	
func _process(delta):
	if(!rotating):
		if(Input.is_action_pressed("camera_rotate_left")):
			rotate_left()
		if(Input.is_action_pressed("camera_rotate_right")):
			rotate_right()
	else:
		rotation_degrees = Vector3(rotation_degrees.x,lerp(rotation_degrees.y,targetRotation,ROT_SPEED*delta),rotation_degrees.z)
		if (rotation_degrees.y == targetRotation):
#Re-enable when finished rotating = false

However, this didn't work as expected - the rotation would stop, but not finish, before reaching a 90 degree change. Since the starting rotation was 45 degrees, if the target was then 135 (45 + 90), the rotation would stop at 134.999969482422 degrees (which changed to 135.000015258789 when I moved the window)

This meant that I had to round the current rotation value to compare to the target, and rather than an equals comparison use a "greater than or equal to", in case it rotated slightly too far.

As you can see, the "rotation_degrees" property is a Vector3, which is a structure that uses 3 floats as the values. But all number types (int, double, float etc) all have a maximum value (which differs for each type) - once that is reached, if you add 1 to that number, the result is then the minimum possible value (this is called "overflow"). What would happen when this number is reached for the Vector3? I have no idea, but with the code as above it is possible to just keep rotating until you reach that point. Since I don't know what would happen, and the numbers could be absurdly huge, it makes sense to restrict it to smaller numbers to avoid this and make debugging in future far easier.

The next step was to adjust the values so that if it goes below -360 degrees or above 360 is then adds or subtracts 360 to keep it within a reasonable boundry.

When testing this out, though, it looked like it was acting like a coiled spring - when the target value got above 360 (which would be 405, so it would then be set to 45) it would suddenly "spring" back rather than smoothly animating. Putting in debugging, it seemed to be rotating twice at once.


This is apparently from using the "Input.is_action_pressed" function, as it seems to keep executing the action repeatedly. Perhaps, despite the flag trying to prevent this, it was picking up the instructions across two frames? Maybe there is a race condition, and the function was executing asynchronously? Regardless, switching it to "Input.is_action_just_pressed" seems to restrict it to only one press at a time.

However, still the change is rather sudden, the final change not having any animation to it.


The ultimate solution was to allow it to overflow for the purposes of animation, and then to adjust the value after the rotation has finished. At least for rotating right, where the numbers are increasing. When decreasing, because of the check (greater than or equal to) it meant that the rotation was finishing early. So the comparison needed to change depending on a switch with 3 states - an enum rather than a boolean flag.


The final code for this is below.

extends Marker3D

enum RotationType {NONE, LEFT, RIGHT}
const ROT_SPEED = 10
var rotating = RotationType.NONE
var targetRotation = 0

func _ready():
	targetRotation = rotation_degrees.y
	print("Starting, current rotation is " + String.num(targetRotation))

func rotate_left():
	targetRotation = targetRotation - 90
	rotating = RotationType.LEFT
	print("Setting target rotation to " + String.num(targetRotation))
	
func rotate_right():
	targetRotation = targetRotation + 90
	rotating = RotationType.RIGHT
	print("Setting target rotation to " + String.num(targetRotation))
	
func _process(delta):
	if(rotating == RotationType.NONE):
		if(Input.is_action_just_pressed("camera_rotate_left")):
			rotate_left()
		if(Input.is_action_just_pressed("camera_rotate_right")):
			rotate_right()
	else:
		rotation_degrees = Vector3(rotation_degrees.x,lerp(rotation_degrees.y,targetRotation,ROT_SPEED*delta),rotation_degrees.z)
		var normalised_y = rotation_degrees.round().y
		if ((normalised_y >= targetRotation && rotating == RotationType.RIGHT) || (normalised_y <= targetRotation && rotating == RotationType.LEFT)):
			#Re-enable when finished
			if (normalised_y > 360):
				normalised_y = normalised_y - 360
			if(normalised_y < -360):
				normalised_y = normalised_y + 360
			rotation_degrees.y = normalised_y			
			targetRotation = normalised_y
			print("Finished rotating, target rotation = " + String.num(targetRotation))
			rotating = RotationType.NONE

Friday 19 May 2023

Kain Amigurumi

This is one I started working on pretty much immediately after finishing my previous doll - the namesake of the Legacy of Kain series: Kain (in his Elder Vampire form)

It's been quite hard to work up the motivation for typing this up, in part because I sort of live-tooted it over on Mastodon

Nevertheless it's been a bit of a long journey - we have a puppy who would probably try to eat whatever I make, so I was only working on it during my lunch breaks when I'm in the office (so at most a couple of hours each week)

Through into that my getting an abscess on my back and getting it surgically removed, there's been a lot to get in the way (up-side though is that I now have a hole in my back that I could hang crochet hooks off of if I were a complete lunatic)

This one used the same base as the others (AmiguruME by Allison Hoffman), but of course, with some adaptations. The flesh was done in a dark green (I couldn't find anything to accurately be the sickly-vomit-green-and-yellow of his flesh in the games, so this was a good abstraction in my opinion) and the legs in plain black.

Legs/Feet

I used the same technique for the feet as I did with the Janos doll, but used a sort of off-white acrylic yarn to give it a sort of ivory colour. This was also to try to make a clear distinction between the claws and the hair.

The grieves were done right at the end - using the "traverse root" method (just doing a bunch of slip stitches into existing stitches as a basis for more) I made them using some yellow acrylic to make them sort of golden. I wanted to do this to make the legs more interesting. Despite measuring them against one another, I didn't remember the number of rounds/rows, so they ended up slightly different heights. I'm quite annoyed by this whenever I look at it. You could call me a-grieve-d! (I'll get my coat)

Arms/Hands

As mentioned, the flesh was in a dark green acrylic yarn, changing to a brown alpaca wool for the sort of leather wraps, then finally to black for his gloves.

Following the Commander Sterling doll, I discovered that Allison Hoffman had created a pattern for hands with fingers, which is sold on her shop.

Of course I bought it, so that the fingers would be in better proportion. It took me ages to get around to downloading it. In fact, I had waited too long, so the link was invalid. However, Hoffman re-enabled the link for me once I emailed her about it - top tier customer service.

To make the claws I joined the fingers together into pairs and then used decreasing to make them pointy. I made the thumb twice as wide on the hand and did the same thing to decrease to a point.

Body Accessories

In terms of the body, there were a few accessories to make.

First of all was the cape. I absolutely obsessed over this. I wanted to see if I could get the symbol onto it by doing colour changes, and minimise carrying across stitches (because that looks messy)

I created a tool in ReactJS in order to visualise this... and found that if I were to do it in the size I want, I would have to embroider it instead. Oh well. (Note, I'll make the tool available eventually)

I also made the cape a bit short - in my head, it went to the centre of the chest (under the medallion), and the rest is leather straps, so I worked to that.

Then I decided to use the toy as a reference, and found that the cape should wrap right around the body, and instead the leather strap just sort of floats there, not connected to anything other than the cape. Weird.

So I did the rest of the cape, and the leather strap.

The doll next to the action figure, with the paper pattern for the codpiece

The final part was the "Plunging Codpiece (TM)" - I realised that if I were to place the bottom of this at the top of the leg/waist section, it would be too high. Thankfully, I could use the gold/yellow internal section to sort of hide this, make it look like the waist was lower than it was.

I drew the pattern on paper, and went by that rather than a pattern in terms of stitches and rows. I'm pretty pleased with the result.

Head/Face

The face was relatively normal, following the pattern and using white acrylic for the hair. Looking at the toy I was using for reference, I tried to draw the crests. They looked to be in three parts, but had to be distorted because the doll's head is stretched in comparison to the more realistically proportioned toy. I think it ended up looking a bit strange, and not so much of a scowl, but it did hide issues with the hairline. The earring was a very simple thread with a knot at the end, stitched into the left ear.

The back of the doll, showing that I cut the hair far too short

In terms of the hair, I made it extremely long in order to get it to the right length, and then cut it down. However, when I ended up cutting it, I definitely cut it a bit too short, because some of the strands would have been loose (they were too short). I just have to keep reminding myself that this is an abstraction.

To quote a famous dog that lives in a burning house, "This is fine!"

Conclusion

There are a few changes I would try to make were I to do this again, but overall I'm happy with the result, despite some niggling little issues that annoy me.

I may eventually have the patience to try to make him a Soul Reaver to hold, but I don't know how to make skulls, and I also don't know how to make the kriss blade without making it too floppy.

Monday 22 August 2022

Commander Sterling

I've been keeping this one under my hat, a wee bit.

It's fair to say that I'm a fan of James Stephanie Sterling's work - I remember when they started publishing videos on the Escapist, and at first they weren't for me, though eventually I went back and got hooked.
Seeing their transformation, and hearing their explanation about it, has definitely helped me overcome a great degree of ignorance when it comes to LBGTQIA+ issues.
Since they started wrestling not just in England, but local to me, I wanted to make a doll of them to give as a present, which I managed to at the debut of Avant Garde wrestling:

On a separate note, it was my first live show - I may do a bit of a write up, though I'm not familiar enough with the art to go much further than "I enjoyed it!"

The doll itself is, like the other dolls I've made and intend to make, based upon the patterns in AmiguruME by Allison Hoffman.
The main differences to mention are:

  • The Mask
  • The Cape
  • The Arms
  • The Body

The Mask

For the mask I followed the main wig cap pattern, but when I got to round 15 (around where the nose is) I would start with a ch1, reverse, inv dec, sc until the last two stitches, inv dec. I then kept decreasing until I ran out of space. The downside to this is that it neglects the chin strap, though that was difficult to see in the material I used as references.
After then squeezing that on top, I made a star out of some yellow yarn (the closest I had to gold) to stich in place. Attaching the safety eyes after this was nothing short of a nightmare, but I got there in the end.


The Cape

For this I effectively made two capes - one using a colourful rainbow-esque yarn I had (it would be lovely if there were some "space" yarn, but I thought it was nice and suitable) followed by the same in a metallic grey (to simulate silver).
I then stitched the two layers together, for the final effect.
I think I used the blazer pattern as a base, but just kept expanding outwards until it was wide enough, but I can't fully remember. I keep thinking that maybe I should have made the cape a bit longer, but I am happy enough with it.

The Arms

This was a major deviation - the arms in AmiguruME are rounded, without any fingers, and I wanted to branch out a bit. To do this, I followed the patterns from Edward's Crochet Doll Emporium by Kerry Lord. The issue was that the arms in that book are longer than those in AmiguruME, even before you factor in the fingers.
This taught me quite a lot about the nature of crochet - I tried using a smaller hook, for example, but I crochet so tightly that it doesn't make much of a difference. The overall size of the work is a combination of the size of the tools, the tension, the size of the yarn, and the number of rounds.
The arms ended up slightly too long, so in future I will try to cut out a few rounds. Either that, or use the (very misleadingly named) "traverse route" technique into future works where I want fingers. I suppose I could try to integrate them in more naturally, but the patterns in the books start from different ends of the arms, making that even more challenging.
When it came to the gloves I switched to a non-metallic white (a bit more on that later) and worked backwards a little bit in order to create the layered effect.

The Body

I followed the "curvy body" pattern, but largely ignored the pattern when it told me to decrease - this meant the breasts lost a bit of definition, so were I to try again I think I would try to increase everything proportionally.
The majority of the body legs and arms are done in a metallic white, with other parts (gloves, boots) done in plain white, in order to represent their wrestling costume.
I did not realise when I started that the jumpsuit is actually grey, but so shiny it looks white in all of the videos and pictures that I had seen. Were I to try this again, I would change the body suit colour.
I put stars over the body, but the yellow I had used for the face-star was too thick to make stars that small. As such, I used some thin threads which were much paler, hence they are completely different colours. Once again, were I doing this again I would invest in matching colours for this.


Time taken

It's difficult to calculate the exact amount of time it took - I specifically remember being in the very early stages at the start of March, in the days surrounding my Granny's funeral. I can't remember exactly when I finished it - I showed it to people, but only on camera, so I cannot trace the exact date. I had definitely finished it by early to mid-June. So that was 13 weeks, round down to 10 for going to a conference etc, working for on average 8 hours a week (in the evenings and during lunch breaks at work), so in total at a guess it was 80 hours of work. No where near my current record of 2.5 years for Janos, but still a lot of work.

Before publishing this blog Steph tweeted about it, and the comments in the thread were heart-warming to read.

Tuesday 15 February 2022

Janos Audron Amigurumi

This one has been in the works for a very long time, but last weekend I finally finished the amigurumi of Janos Audron that I've been working on for (no exaggeration here) - around 2 1/2 years!

Let's get into the details.

First of all, it cannot be understated how big this thing is:
1 foot tall and with a 2 foot wingspan tip to tip!


This was, like the Sunny doll, based on the patterns in AmiguruME by Allison Hoffman, though there were a few adaptations.

The most obvious one is the wings. When I started these off I was using a Magpie pattern from Hanneke's Designs. However, the free CAL (Crochet A-Long) period ran out while I was working on it, and I didn't have a backup. Rather than buying it, I reflected and felt that the pattern just wasn't quite right.

Eventually I managed to find this Pegasus by Crafty Designs, which I felt would result in something large enough with enough detail to satisfy me.
I really am too much of a perfectionist, but not so much that when I found the wings were slightly different sizes (due to my differing tensions) that I was willing to start again - this part alone took up the bulk of 2 years!


Another change is the feet. From the reference photos, you can see that Janos doesn't have shoes - he has exposed feet with two large claws, then wrapped in a sort of foot-wrap that goes around the balls of the feet. Another book I have, AmiguruME Pets (by Hoffman again) features a pattern for a dinosaur, where the ankle is the same width as for the human patterns! Perfect, except the dinosaur features 3 toes. As such I had to do some maths to resolve it (I'm hesitant to post the exact instructions, though, as since it's based on someone else's designs I'm not sure if that crosses a line)
The end result works very well, though!


The next big issue was the tunic. Following Hoffman's pattern for a blazer, it didn't quite fit due to how I had attached the wings. As such I did each of the three sections according to the pattern, but effectively doubled the arm-hole piece (HDC across a row, then do the increase or decrease) - I also made one of the sections one row longer than the others (and didn't finish it off).


Once each of the three sections was done, starting with the part that I intentionally made longer, I effectively continued the stitching into the bottom of the back piece and then into the other side - as a result, they were naturally joined together rather than needing to stitch them with a thread and then continuing onwards. I added many more rows to make the tunic as long as needed.

Then came the collar piece. Despite looking up patters for capes and pauldrons, I could not find anything appropriate, so I had to sort of free-hand it. I made a "model" out of a piece of paper, and then just stitched using it as a template. That also worked rather well!


The final flourishes were a bit basic - a golden belt, a sash over the shoulders, and the face (including tiny stitches to be the fangs)
Over all, I'm happy with the result. I hope to never do wings ever again, but still want to do more Legacy of Kain characters (eventually)

To finish, here's a close up of the face, and the final resting place: My display cabinet, with a Raziel toy for scale.

A close up of the face


In the cabinet


Monday 7 September 2020

Re-design & the interactive timeline

A lot has happened in the past couple of years. I got married, had a child, switched jobs, and the apocalypse started. So many changes.


Similarly, I've changed the site a bit.

I've updated the Legacy of Kain Timeline to use Vue rather than the mix of Bootstrap, Jquery and Knockout. The end result is that there is less data to load, so the page should run faster.

Doing a calculation on the folders involved, the new page is almost a full Megabyte smaller than the previous. In modern times this payload difference probably doesn't mean too much, but it helps a bit, and it means that the libraries for making the page function are also smaller. Fewer calls, fewer complications results in it being outright quicker to run and respond to changes, even on my terrible laptop.

For example, changing the colour or toggling entries on the old one would take a few seconds for everything to be recalculated. In the new version, the changes are nigh instantaneous, because it is just changing the elements that have changed, not the entire page.


Part of the complication was changing libraries - I switched from using bootstrap to using vuetify. Both of these use similar layout methods (e.g. a 12 grid layout) but vuetify uses flex. Changing this meant that I had to adapt the whole page layout. Though this took a while, it was worth it - it's quite obvious that I had no idea what I was doing with the old layout (I put in column declarations, then overwrote them all, so what was the point of the declarations?)

I then filtered those changes through to the entire site, including this blog. I also removed redundant files, so my site should take up less room on the server for now.


All in all, it was a long arduous process, but hopefully worth it both for myself and for whomever navigates the site.


There is more content coming, but life is full-on.

Thursday 27 September 2018

Potential Predator screenplay

Somewhat inspired by a video titled "Stop trying to make us like the Predator", I've come up with a rough idea for how the next Predator film should go.
In the near-ish future, the Earth is in peril. The environment has been badly damaged, and to try and compensate for this we reduced our farming of animals for food, but that hasn't helped enough.
We have expanded to have outposts on other planets, starting to abandon Earth. Nearby to one of these colonies, Weyland-Yutani have found a planet that is resource rich, and populated by extremely docile animals. A situation somewhat like when we discovered Dodos, there are no apex carnivores, so the planet is brimming with herbivores.
Of course, the company wants to take advantage of this situation, mining for resources and shipping these animals back to the colony for food. There is concern from some that they may be over-zealous, ruining the planet like we did Earth, others claiming that it's a gift from God and should be fully exploited.
Unbeknown to the company, the planet was essentially a Predator/Yautja farm.
Seeing us as a menace, some of the Predators follow the company ships back to the colony, and the hunt begins.
This group of Yautja ride some kind of live mount, and they control Xenomorphs using some kind of sonic technology.
They don't hunt us themselves, but instead watch the Xenomorphs do it to us.
Yes, this is a fox-hunting metaphor. In the interests of being balanced, well-meaning protesters will also get slaughtered.

Just to be clear:
Humans = foxes
Predators = humans
Mount = horses
Xenomorphs = hounds
Eden planet = hen house